Guidelines to set up an I2P reseed server over Cloudflare

Based on the original definition from I2P homapage, a reseed server consists of a Java I2P router, an HTTPS web server, and some scripts that periodically gather router infos from the router, bundle and sign them into a custom file format, and deliver these files over HTTPS.
This tutorial will walk you through the process of setting up a reseed server and routing its traffic over Cloudflare. You may ask: “But why Cloudflare?". In fact, you don’t have to serve your reseed traffic over Cloudflare, and can just follow the original guidelines on I2P homapage to set up a reseed server running on your own server. However, Cloudflare manages a large Content Delivery Network (CDN) that can be used to improve several aspects of your reseed server. These are three primary reasons (opinions) why I choose to route my reseed traffic over Cloudflare.
- Increased security. Routing your reseed traffic over Cloudflare helps hiding the actual IP address(es) of your reseed server. So malicious traffic, including those from Denial-of-Service attacks, cannot directly affect your original server without bypassing Cloudflare.
- Improved performance. Cloudflare, with its large number of data centers distributed around the globe, can optimize the delivery of the reseed bundle (i.e., the su3 file) to I2P clients worldwide. The real latency from an I2P client to your reseed server will be reduced close to the latency from that client to her nearest Cloudflare data center.
- Censorship resistance. By putting your server on Cloudflare, in most cases, it will be sharing a pool of IP addresses with many other websites. Any censors that conduct IP-based blocking against your server would have to think twice about the collateral damage of also making thousands (or even tens of thousands) of co-hosted websites inaccessible. Furthermore, in our recent paper at USENIX FOCI ‘19, my co-authors and I show that several censors block access to I2P services based on the Server Name Indication (SNI), thus encrypting SNI would remedy this problem. Currently, Cloudflare is the only provider that supports Encrypted SNI (ESNI). Although ESNI has not been widely adopted while I2P router software has not been implemented to fully support ESNI in TLS1.3 yet, I believe that ESNI adoption is a necessary step to make the Internet more resistant to censorship. Therefore, I choose to proxy my reseed server over Cloudflare to prepare for a future when ESNI becomes standardized and widely adopted.
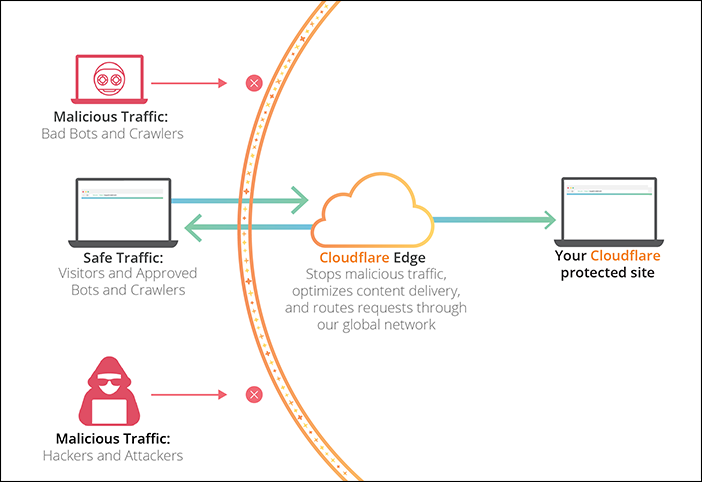
For demonstration purpose, I hereby borrow an image from Cloudflare to illustrate some points discussed above.
To follow this tutorial, you therefore need a Cloudflare account, in which your domain name is managed. For your reference, you can add your domain name to the Cloudflare account, or you can fully transfer it to Cloudflare Registrar.
0. Prerequisites
This section will walk you through the process of installing required software packages. My operating system for this tutorial is Ubuntu 18.04 LTS. According to the original guideline, it is ideal for your server to have:
- the capability to be continuously online 24/7
- at least 2 CPUs and 2GB of RAM
- a Unix environment to run the go-lang I2P reseed tools
- a sufficient amount of bandwidth
0.1 Install I2P router software
Run these commands to install the official I2P package:
sudo apt-add-repository -y ppa:i2p-maintainers/i2p;
sudo apt-get update;
sudo apt-get install -y i2p
Start I2P with this command: i2prouter start if it has not yet launched. At
the time of composing this tutorial, the most current I2P version is 0.9.42.
If you already have I2P installed via Debian Package repository previously, it
can be updated with:
sudo apt-get --only-upgrade install -y i2p
0.2 Install Go-lang
The Go project’s official download page is at https://golang.org/dl/.
If you’re using Ubuntu 16.04 LTS, 18.04 LTS or 19.04, then you can use the
longsleep/golang-backports PPA and install Go with at least version of 1.13.
sudo add-apt-repository -y ppa:longsleep/golang-backports;
sudo apt-get update;
sudo apt-get install -y golang-go
0.3 Install the I2P reseed tool
The official guidelines point to an all-in-one Go solution written by Matt. There are also some forked versions with more features, such as reseed over Tor and IPFS written by IDK or RTrade Technologies Ltd. For the purpose of this tutorial, all of them should function similarly so it’s up to you to choose which one to install, depend on whether you want to add more features to your reseed server later.
export GOPATH=$HOME/go; mkdir $GOPATH; cd $GOPATH;
go get github.com/MDrollette/i2p-tools
You can confirm i2p-tools has been installed properly by changing to the
directory where its binary is stored, and run this command to show help
function.
cd $GOPATH/bin; ./i2p-tools -h
1. Cloudflare Setup
Next, assume that you have created and logged into your Cloudflare account, this section shows you how to configure a DNS record for the host name of your reseed server and obtain its TLS certificate and the private key.
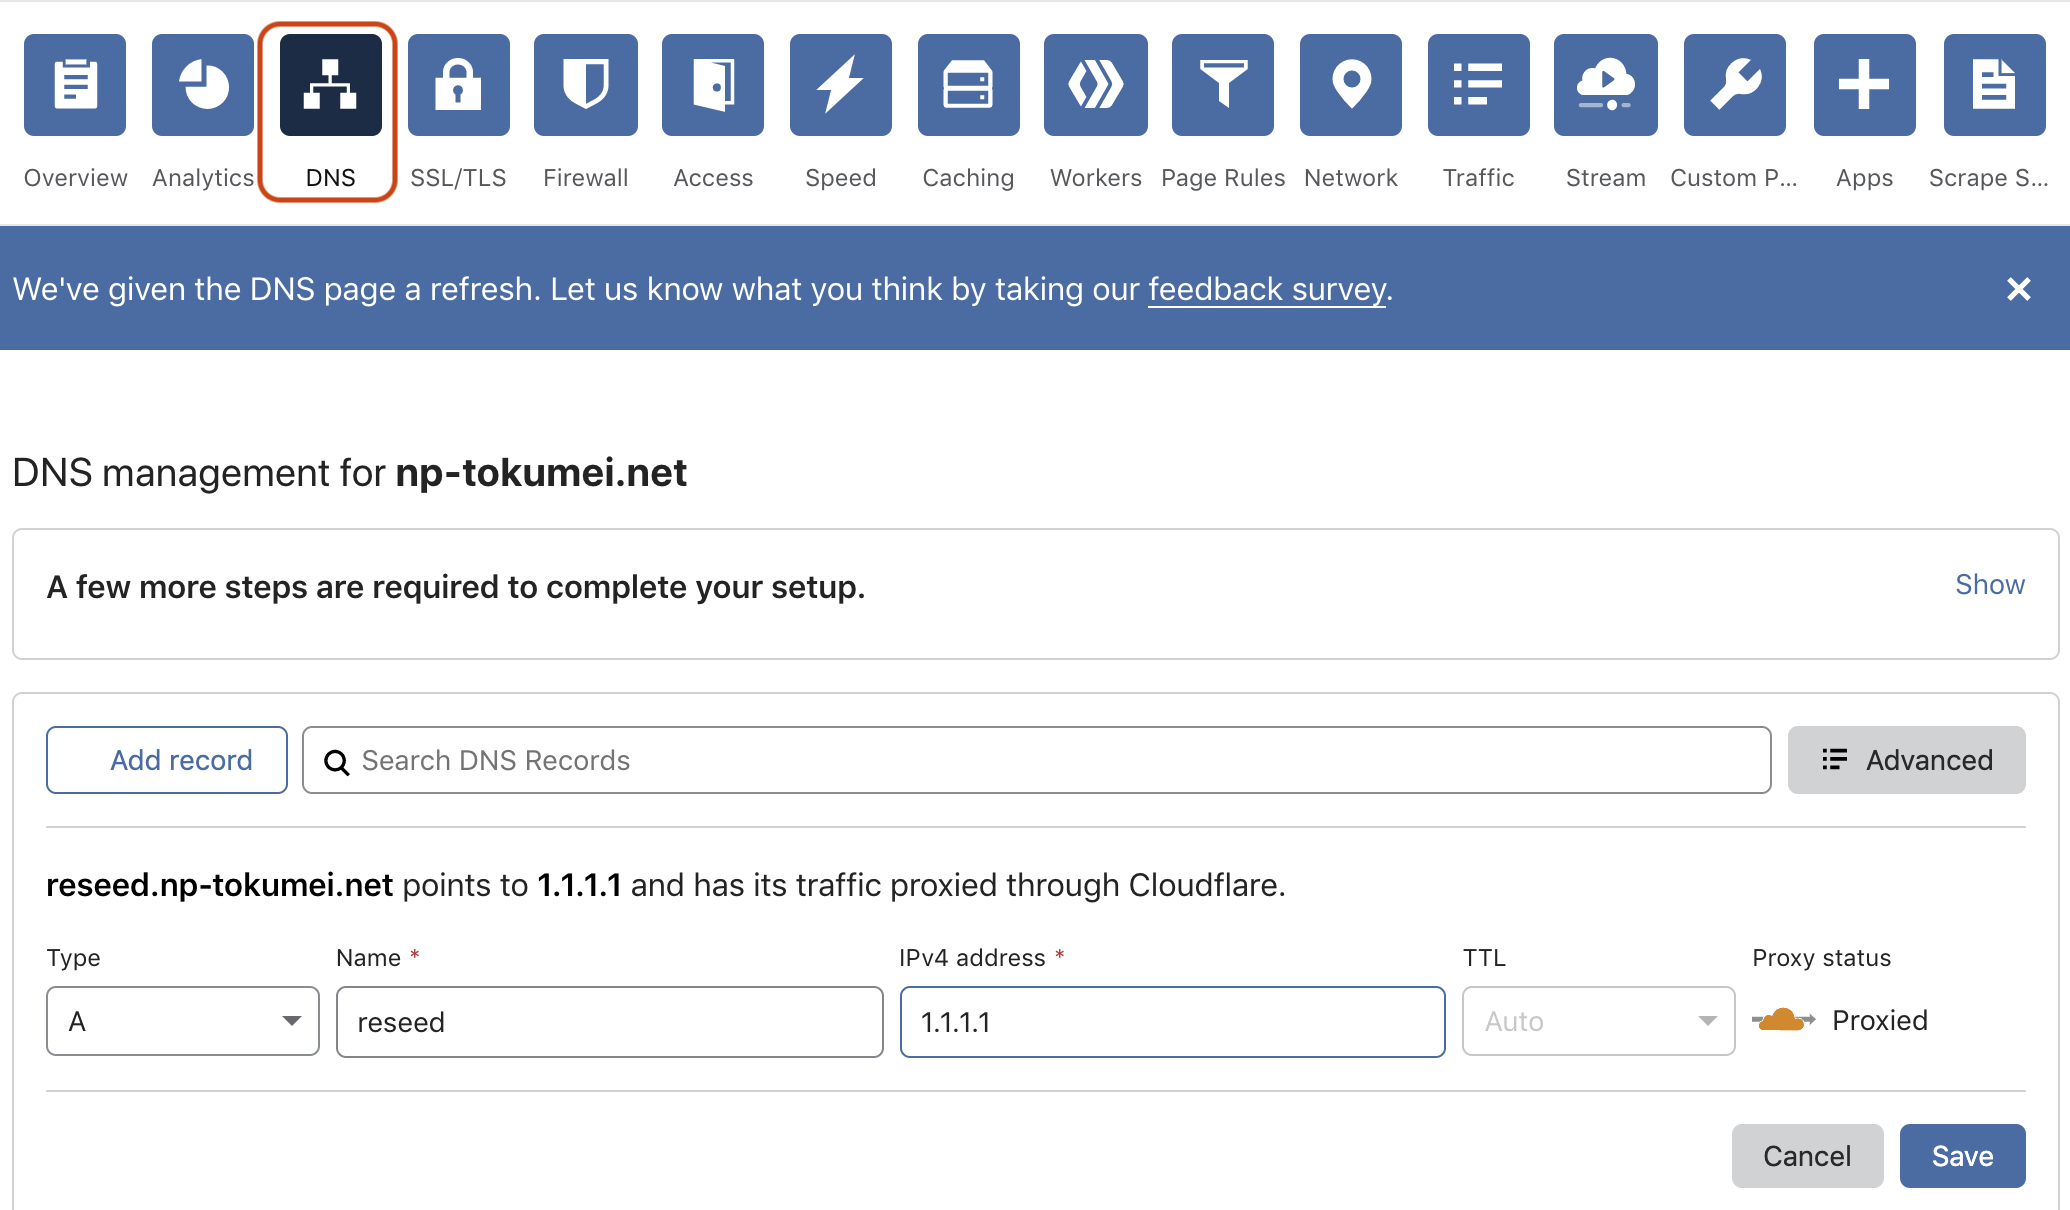
1.0 DNS configuration
Under the DNS Management session, click Add record, and configure
your record with:
- Type: A
- Name: any string of your preference. However, this string should not
contain any dot(.) so that the host name of your reseed server would be
a third-level domain name to your own second-level domain. For example, if
your domain is
np-tokumei.com, then you should have your reseed server host name asreseed.mp-tokumei.com, but NOTreseed.server.np-tokumei.com. This is because Cloudflare’s free TLS certificate only covers up to third-level domains currently. - IPv4 Address: the IP address of your reseed server
- TTL: Auto
- Proxy status: make sure the cloud symbol is in
orangeto route your reseed traffic over Cloudflare CDN. This is very important to mask the real IP address of your server. If you leave the cloud grey for long enough, active DNS measurements may discover and store the real IP of your server.
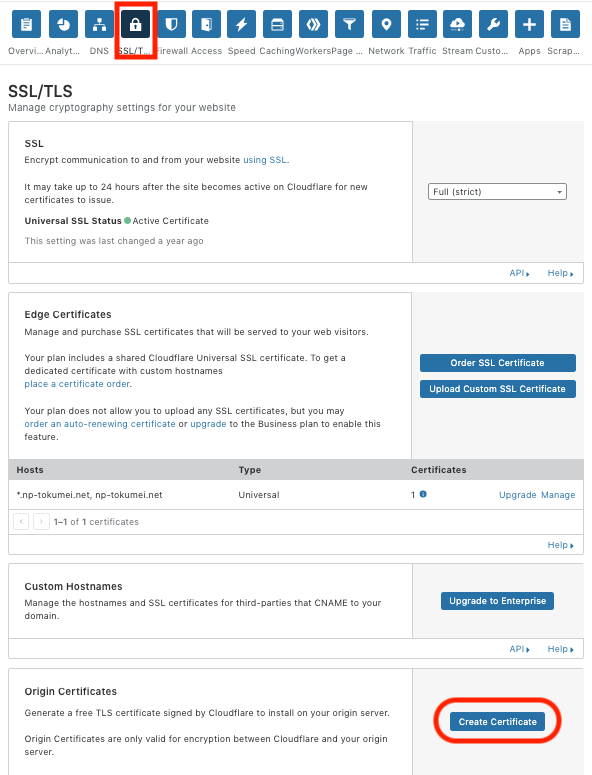
1.1 TLS Certificate
Next, under the SSL/TLS session, go to Origin Certificates and click
Create Certificate.
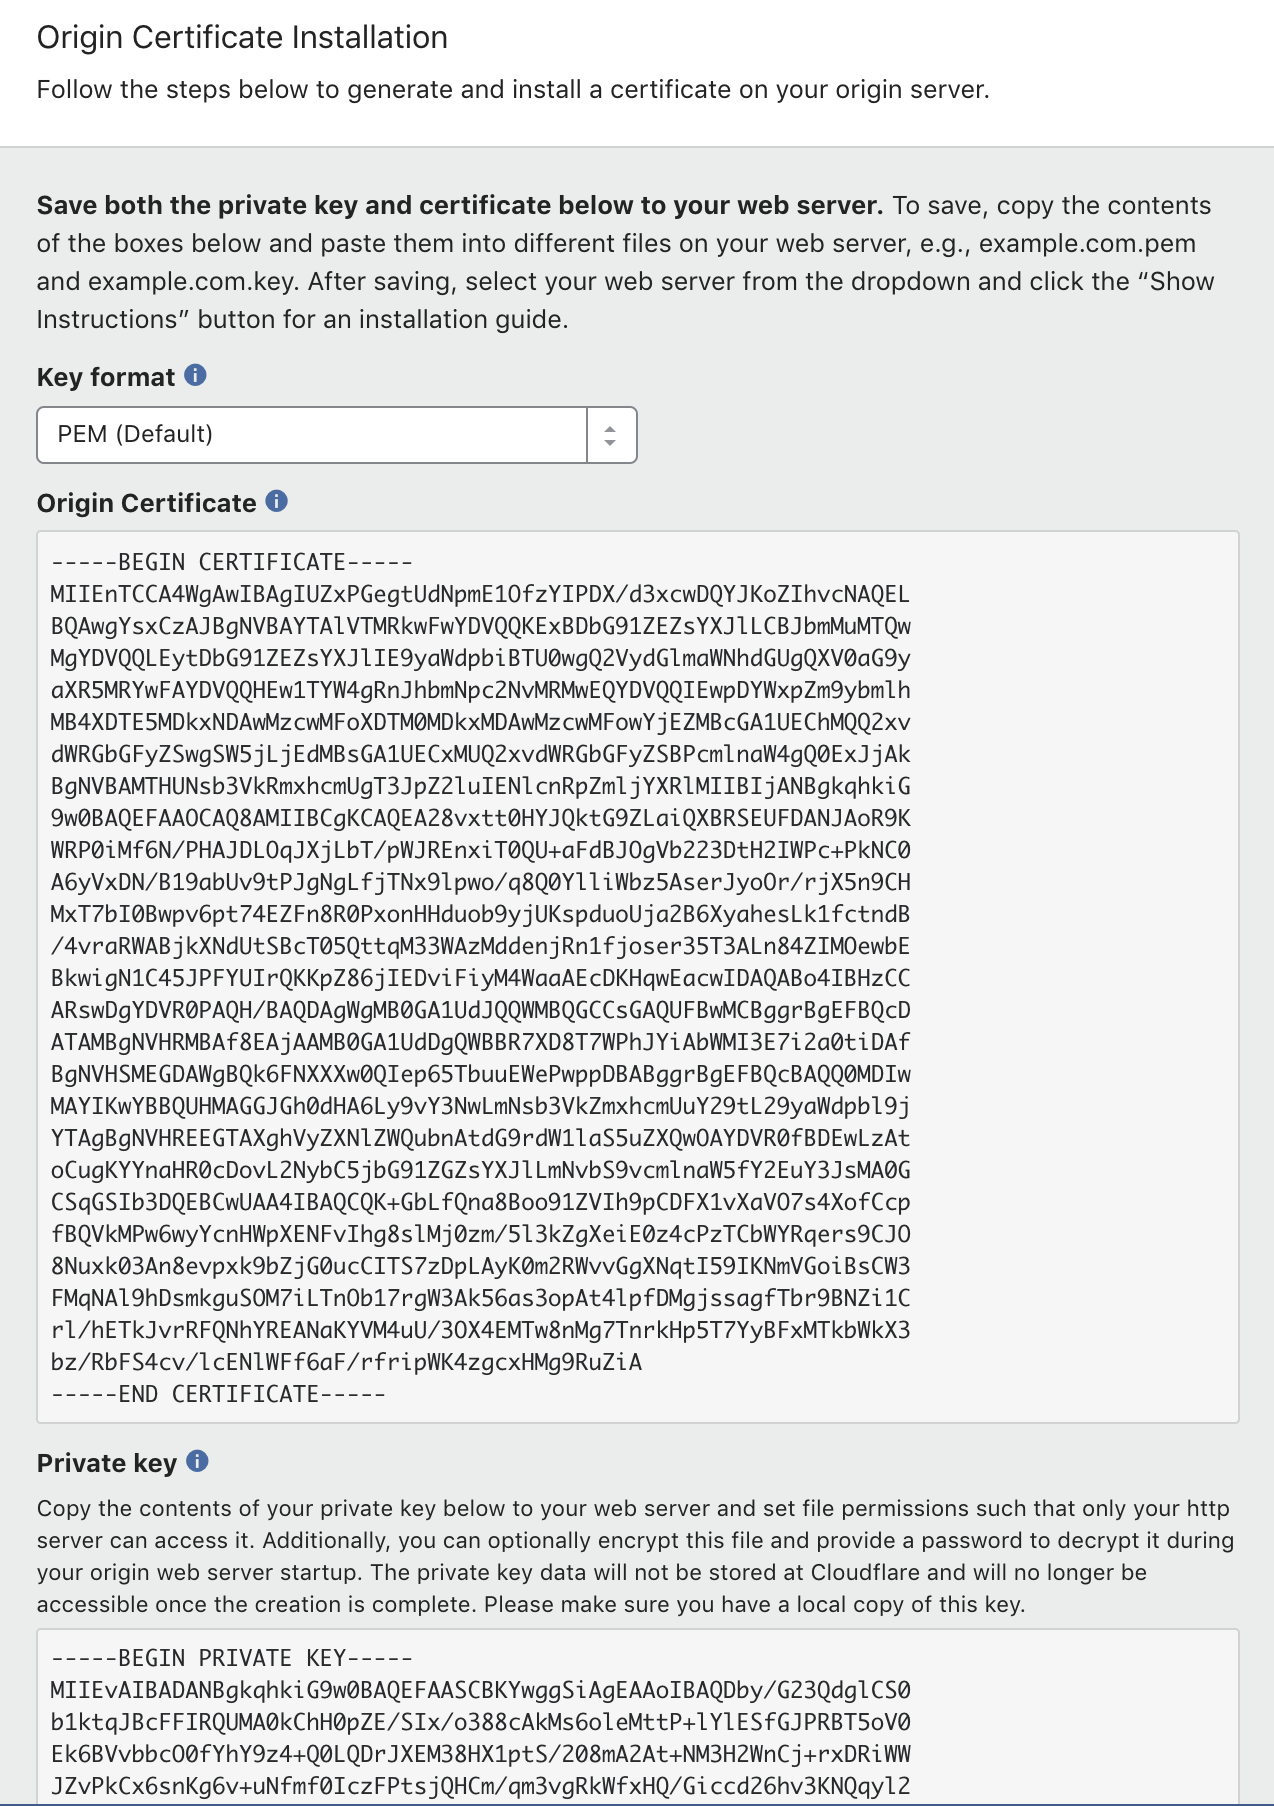
A window will pop up for you to choose the Private key type and the host
name of your reseed server (e.g., reseed.np-tokumei.net).

You will then be provided with a private key and a certificate as shown in the
picture below. Note that I put mine here for demonstration purpose, you should
never leak your private key to anyone. As suggested, save them into two
separate files named: <your_reseed_host_name.tld>.pem and
your_reseed_host_name.tld>.key. Save them in a secure environment with
password protection for later use. You can download the .pem file later from
this dashboard, but NOT the key.
The i2p-tools require a TLS certificate file ended with .crt to work, so
you will need to use this command to convert your .pem file to a .crt
file.
openssl x509 -outform der -in <your_domain.tld>.pem -out temporary.crt
Now you will have a binary certificate named temporary.crt. DON’T try
opening it with cat yet as it will mess up your terminal with non-printable
characters. We then need to convert this binary temporary.crt to a
base64-formated certificate, named <your_reseed_host_name.tld>.crt. In your
terminal, replace <your_reseed_host_name.tld> of your reseed server and run
this command:
echo "-----BEGIN CERTIFICATE-----" >> <your_reseed_host_name.tld>.crt;
cat temporary.crt | base64 >> <your_reseed_host_name.tld>.crt;
echo "-----END CERTIFICATE-----" >> <your_reseed_host_name.tld>.crt
Note the number of dashes (-) is exactly 5 on each side of the BEGIN and
END tags. NO new line at the end of the file is allowed since it will cause
syntax error. Finally, you can delete temporary.crt and put the
<your_reseed_host_name.tld>.crt and <your_reseed_host_name.tld>.key in the
same directory where you will be executing your i2p-tools binary.
2. Reseed server configuration
Now that we have all required software installed, lets navigate to your
i2p-tools binary (normally stored under $HOME/go/bin/) and run the
following command:
./i2p-tools reseed --signer=<your_email> \
                   --netdb=/home/ubuntu/.i2p/netDb \
                   --tlsHost=<your_reseed_host_name.tld> \
                   --tlsKey=<your_reseed_host_name.tld>.key \
                   --tlsCert=<your_reseed_host_name.tld>.crt \
                   --trustProxy
Note the --trustProxy flag! It is important for routing reseed traffic over
Cloudflare since it will let our server to obtain the X-Forwarded-For header
from client requests, which contain the actual IP addresses of newly joint I2P
clients that send the reseed request instead of IP addresses of Cloudflare
workers. As the guideline from the I2P official tutorial suggests that the
reseed server should give the same su3 file to the same client (IP) within a
configurable time period. This helps to prevent bad clients from harvesting
information of many I2P routers in the network.
Since we are running this command for the first time, you will be prompted:
Unable to read signing key your_email.pem
Would you like to generate a new signing key for your_email? (y or n):
Hit y and Enter to proceed and the tool will create three files for you in
the current directory. They are named: *.crl, *.crt, and *.pem, where
* is the email address you supplied for the flag --singer= above. DO
keep these files in a secure environment with password protection, you will
need them later for production mode!!
If the reseed server starts properly, you will see similar outputs to these in your console:
2019/08/20 05:52:18 Rebuilding su3 cache...
2019/08/20 05:52:18 Building 350 su3 files each containing 77 out of 2396 routerInfos.
2019/08/20 05:52:19 Done rebuilding.
2019/08/20 05:52:19 HTTPS server started on 0.0.0.0:8443
I2P reseed server by default runs on port 8443 so make sure this port is
reachable from outside world. The i2p-tools also provides you with some
flexibility to configure this port by using the flag --port in the above
reseed command. However, you should choose a port that is supported by
Cloudflare.
For more detail of how to run the reseed command in background, crontab it at reboot, please refer to the original guidelines.
2. Testing
These are two ways you might want to test whether your reseed server can
successfully provide the reseed bundle su3. For this purpose, you will need
a separate machine with I2P router software already installed.
2.1 Direct fetching
From the second machine, run this command to download an su3 file from your
reseed server. Note that the port value should match with the port information
you set up above. In the original guideline, you will see the command has
--no-check-certificate flag. We don’t need it in our tutorial because our
TLS certificate is Cloudflare’s one already validated by Certificate
Authority. NOTE the user-agent flag as the server will only response to
--user-agent="Wget/1.11.4".
wget --user-agent="Wget/1.11.4" -O test.su3 https://<your_reseed_host_name.tld>:8443/i2pseeds.su3
You should see a file named test.su3 downloaded to your second machine.
Examining the file with the command zipinfo test.su3 should show you a list
of files whose name is in the form of routerInfo-*.dat.
2.2 Reseeding from I2P router console
Next, we want to test if a real I2P client can successfully reseed from our
server. First, you need to copy your reseed certificate (i.e.,
your_singer_email.crt) created by the reseed command above to the second
machine. Note that this is NOT the TLS certificate since the TLS
certificate in our case belongs to Cloudflare, which is already validated by
Certificate Authorities. Only copy the reseed certificate to the location
below:
-
MacOS:
/Applications/i2p/certificates/reseed/ -
Ubuntu:
/usr/share/i2p/certificates/reseed/
Now, on your second machine with I2P running, open a web browser and go to
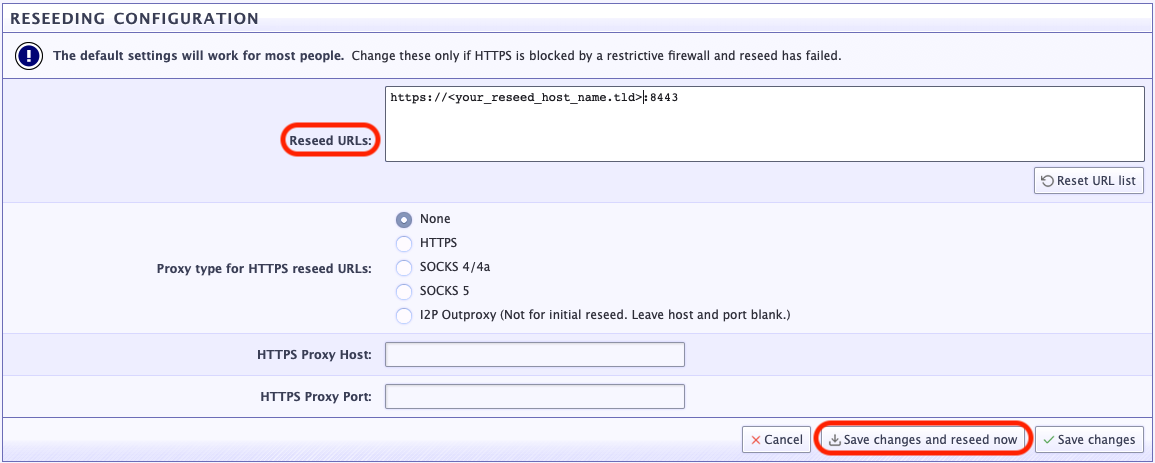
http://127.0.0.1:7657/configreseed. Under Reseeding Configuration,
delete all current URLs of reseed servers, enter
https://<your_reseed_host_name.tld>:8443 and click Save changes and reseed
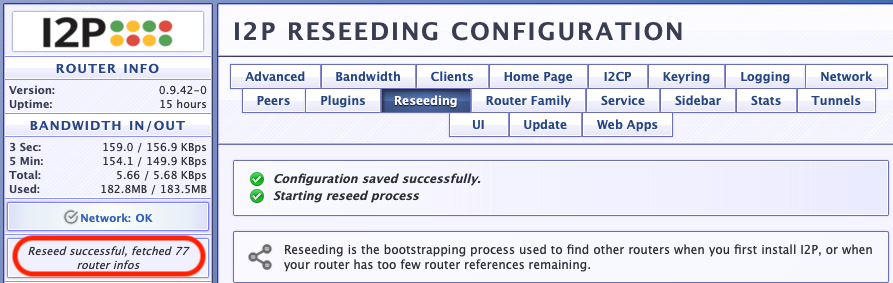
now button at the bottom of the page. If you could successfully reseed as
indicated in this photo, then your reseed server has been set up properly.
If you got an error, visit http://127.0.0.1:7657/logs to investigate
further. After you could verify that your reseed server runs properly, you
should Reset URL list to the list of default reseed servers.
3. Securing your reseed server with iptables and ip6tables
To secure your server from scanners (e.g, censys, shodan) and prevent its real IP address from being exposed, you will need to guard your server with firewall rules. More specifically, it should only response to requests coming from Cloudflare. You can create firewall rules to accept only requests originated from Cloudflare to your reseed server port (e.g., 8443 in this case), and drop all other connections from non-Cloudflare IPs. Note that the IP addresses used below are updated on February 21st, 2019. Please get the most current ones at Cloudflare’s IP Ranges.
sudo iptables -A INPUT -p tcp --dport 8443 -s 173.245.48.0/20 -j ACCEPT;
sudo iptables -A INPUT -p tcp --dport 8443 -s 103.21.244.0/22 -j ACCEPT;
sudo iptables -A INPUT -p tcp --dport 8443 -s 103.22.200.0/22 -j ACCEPT;
sudo iptables -A INPUT -p tcp --dport 8443 -s 103.31.4.0/22 -j ACCEPT;
sudo iptables -A INPUT -p tcp --dport 8443 -s 141.101.64.0/18 -j ACCEPT;
sudo iptables -A INPUT -p tcp --dport 8443 -s 108.162.192.0/18 -j ACCEPT;
sudo iptables -A INPUT -p tcp --dport 8443 -s 190.93.240.0/20 -j ACCEPT;
sudo iptables -A INPUT -p tcp --dport 8443 -s 188.114.96.0/20 -j ACCEPT;
sudo iptables -A INPUT -p tcp --dport 8443 -s 197.234.240.0/22 -j ACCEPT;
sudo iptables -A INPUT -p tcp --dport 8443 -s 198.41.128.0/17 -j ACCEPT;
sudo iptables -A INPUT -p tcp --dport 8443 -s 162.158.0.0/15 -j ACCEPT;
sudo iptables -A INPUT -p tcp --dport 8443 -s 104.16.0.0/13 -j ACCEPT;
sudo iptables -A INPUT -p tcp --dport 8443 -s 104.24.0.0/14 -j ACCEPT;
sudo iptables -A INPUT -p tcp --dport 8443 -s 172.64.0.0/13 -j ACCEPT;
sudo iptables -A INPUT -p tcp --dport 8443 -s 131.0.72.0/22 -j ACCEPT;
sudo ip6tables -A INPUT -p tcp --dport 8443 -s 2400:cb00::/32 -j ACCEPT;
sudo ip6tables -A INPUT -p tcp --dport 8443 -s 2606:4700::/32 -j ACCEPT;
sudo ip6tables -A INPUT -p tcp --dport 8443 -s 2803:f800::/32 -j ACCEPT;
sudo ip6tables -A INPUT -p tcp --dport 8443 -s 2405:b500::/32 -j ACCEPT;
sudo ip6tables -A INPUT -p tcp --dport 8443 -s 2405:8100::/32 -j ACCEPT;
sudo ip6tables -A INPUT -p tcp --dport 8443 -s 2a06:98c0::/29 -j ACCEPT;
sudo ip6tables -A INPUT -p tcp --dport 8443 -s 2c0f:f248::/32 -j ACCEPT;
The above commands are to accept requests from all Cloudflare’s IPv4 and IPv6 addresses. The following two commands need to be add after the above to drop all connections from non-Cloudflare IPs.
sudo iptables -A INPUT -p tcp --dport 8443 -j DROP;
sudo ip6tables -A INPUT -p tcp --dport 8443 -j DROP
To verify the current state of your IP tables:
sudo iptables -L;
sudo ip6tables -L
To export rules to into file and reload them after every reboot:
sudo iptables-save > /etc/iptables.up.rules.v4
sudo ip6tables-save > /etc/iptables.up.rules.v6
Then, add these lines to /etc/network/if-pre-up.d/iptables:
/usr/sbin/iptables-restore < /etc/iptables.up.rules.v4
/usr/sbin/ip6tables-restore < /etc/iptables.up.rules.v6
Finally, change the file to be executable:
chmod +x /etc/network/if-pre-up.d/iptables
Bonus: if you messed up and wanted to flush your iptables and ip6tables, use these command to delete all rules. NOTE: be cautious when using these commands as they will remove all previous rules you might have had.
sudo iptables -F INPUT; sudo ip6tables -F INPUT
4. Production
Now that you have a running reseed server secured behind Cloudflare, you can
contact I2P’s reseed coordinator at [email protected] or [email protected].
Send backup information about your reseed server if you want it to be part
of the default list of reseed servers. Or if you just want to help some
friends who cannot bootstrap into the I2P network due to reseed server
blocking,
just give them this information:
- domain/url/port of your reseed server
- the su3-signing certificate, which is the
your_email_address.crtfile - TLS certificate (iff self signed). Again, this information is not needed if you follow this tutorial because Cloudflare already takes care of certificate validation for us, read more.
5. Closing remarks
If you run into problems while following this tutorial, feel free to contact
me at [email protected] or DM me on Twitter @NP_tokumei, I
will try my best to help as much as possible. Or, you can also reach out to
backup via the emails provided above, or ask questions on zzz’s forum on I2P
at http://zzz.i2p/topics/1893 or http://zzz.i2p/topics/1893.
I do plan to keep the reseed server (https://reseed.np-tokumei.net:8443)
that I set up using this tutorial running as long as possible for those
censored users who cannot access the default list to be able to join the
network. So feel free to add the above URL to your reseed URLs, name my
su3-signing certificate as i2p.reseed_at_protonmail.com.crt, save the
following TEXT to the file and add it to ~/i2p/certificates/reseed/
directory.
-----BEGIN CERTIFICATE-----
MIIF4zCCA8ugAwIBAgIRAPojnWFToTIZZQ6prxKvyIswDQYJKoZIhvcNAQELBQAw
eTELMAkGA1UEBhMCWFgxCzAJBgNVBAcTAlhYMQswCQYDVQQJEwJYWDEeMBwGA1UE
ChMVSTJQIEFub255bW91cyBOZXR3b3JrMQwwCgYDVQQLEwNJMlAxIjAgBgNVBAMM
GWkycC5yZXNlZWRAcHJvdG9ubWFpbC5jb20wHhcNMTkwOTEyMDE1NjAyWhcNMjkw
OTEyMDE1NjAyWjB5MQswCQYDVQQGEwJYWDELMAkGA1UEBxMCWFgxCzAJBgNVBAkT
AlhYMR4wHAYDVQQKExVJMlAgQW5vbnltb3VzIE5ldHdvcmsxDDAKBgNVBAsTA0ky
UDEiMCAGA1UEAwwZaTJwLnJlc2VlZEBwcm90b25tYWlsLmNvbTCCAiIwDQYJKoZI
hvcNAQEBBQADggIPADCCAgoCggIBAKkSo0QeG03nKu+nWqZoFukXSSO9VXOJc6bV
TP3uacK87BSdFwkkX2a42Qe8/Ox4IydrB0+WkE0fV0Fs4k1+QNyxl9sx4FgXwwUj
7D7k//h5uUGto6CI4OJjiiJDQbUZem8hNOt5MBQspQObdXn3ixRh1HpGsHsD6d2O
F5uo6pGxW4u7jXzB2ezUpKdu9NPtPz8Pq0Qyi33GICKhZskiBWPB0Fbp0SyHJJiP
YmnQqIddx4AMU46pxpC3938/jNqxSX4tqmkRThAdO1ClLoOXGJnepHzIyRB4sVAf
Vn8k5BXa66UxjFaoe/V1YUR/AYFVrENu4E73QIT7zyv7LY1cxAgZo9eFldikjzby
hMBKee5NGpUTCl26KmzTLtTHqAj/NqXKR7OEg40N/0b4YZ4ZeFlTPnbPumU7cKiu
8odqWYfeLgY/sudyvlw93cH8gtLkGJ6smNU9iZYuhbedMofBY+6OzpioyqF6mDyE
jQ3cTBgxWLxkDhcZkW1nwS4yrvCHH7HUeWjZ7BmUHGFaPWObsLGcFbFse8kY0XFy
npnCkjFbXPESO7BrNOH3VLbDmY4eJyfpmmdBkw/TXP/UPR+m1II9CN4tgs9JQvtX
oxTvNZkE4wewvbCy/fppA4dWYrFcn7b1sxAWEuQ8VUIsziFSTVEVMXvUjhuGVZCo
TnJIfvfrAgMBAAGjZjBkMA4GA1UdDwEB/wQEAwIChDAdBgNVHSUEFjAUBggrBgEF
BQcDAgYIKwYBBQUHAwEwDwYDVR0TAQH/BAUwAwEB/zAiBgNVHQ4EGwQZaTJwLnJl
c2VlZEBwcm90b25tYWlsLmNvbTANBgkqhkiG9w0BAQsFAAOCAgEABLw0DqdnuSWA
qxaxQL44QPT93jTfScI1JFYuxq36jq8bnHBySqWC+7z8L/6XW42u1EOZHBCQEE6O
HHcNQ2a5/8+iUY9vgx/cZlBrN7n2UWCAgP4PIneb53glhwkXCuiS9Ie8xHZZgbVz
a6IV8NQvW3GQp71fFHP9gdifohmF4DSQepwSOz9bfMKMo2YtfnvZoEg3mRiYtYa3
hLfwATvdu/TX1ruGMOK5JjjiEgd1Y2O0wOUyTwtONqlDKd+FuCM2GXglEWpX81Bw
1gSKQgABPO+pBtM5rX5SWk6phMJilMHwJAfff3PA19m9FZP4VVhjp1RmMk2cF3Xy
h2ziXEb797Do1hEabBu6u85SRj6+hP7Wt0vmvqgicY1xgoxvI7x5vuW1qSNjJ1Dj
FZcRsh28fUIBseQzPNVA8S5h1j4xKCTbYSKnBEGhsPrNkMs8Qlmw1SdU2Tr3boY9
RIDxxbn01i+HyLEwixfiyevcGPUq/uuvXFLlZSUWHfRb2Zo8LTQScZX45bXJnca1
5lUPcTe5xYOqRr842nMr2NEnN6tDq2GTLSjH+/dRgZ0DZf6607awEneIQZvWPGwa
oX5ExN11mISnymUpLm7/QgL1o8qepBsAMrN/ReBJtaLR+X3Jn96M+bbu/G4abRrA
q90/pGpZM3+Tq73rhzeQpOEdfs/dUTs=
-----END CERTIFICATE-----